Setting Bind Keys in Cadence Virtuoso Using SKILL Code
Contents:
- Single Action Bind Key
- Multiple Actions or Complex Steps
- Setting BindKeys for Functions
- BindKey Components
- Loading Bindkeys
- Conclusion
Bind keys in Cadence Virtuoso are a great way to boost your productivity and simplify your design work. They let you set up custom keyboard shortcuts for specific tasks, so you can breeze through repetitive actions faster and more efficiently. For the best results, use bind keys for quick, frequently-used tasks. Avoid setting them for actions that take a long time, as you might accidentally trigger one and end up waiting for your Virtuoso session to unfreeze. Nobody wants to be stuck for five or more minutes because of a misstep!
You can configure bind keys manually using the "Bindkey Editor" form (CIW ⟶ Options ⟶ Bindkeys) or automate the process with SKILL code, which we will cover in this guide.
1. Single Action Bind Key
To define a bind key for a single action, use the action's function. For example, to make all layers invisible except the selected layer in the Layout window’s palette, we use a built-in SKILL function:
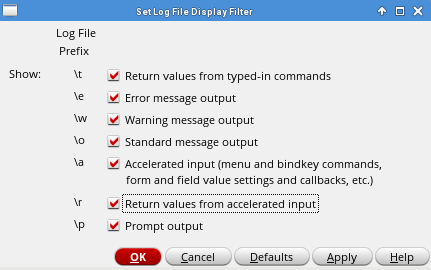
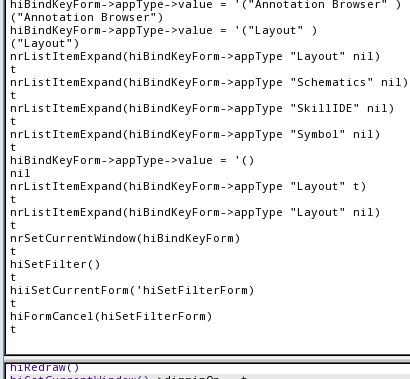
1hiSetBindKey("Layout" "Ctrl<Key>Q" "leSetAllLayerVisible(nil)")Tip: To discover functions for most actions, enable all filter options in the "Set Log File Display Filter" form (CIW ⟶ Options ⟶ Log Filter), perform the action, and check the CIW terminal for the function used.

Log File Display Filter Menu

Log File Display Filter Output
2. Multiple Actions or Complex Steps
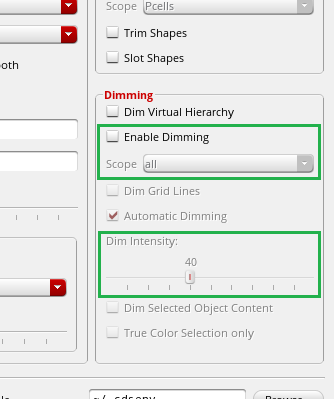
For multiple actions or steps, define a function. For instance, toggle the dimming option and change the dimming intensity in the Layout window. These options can be found in the “Display Options” form (Layout window ⟶ Options ⟶ Display).

Enable Dimming Menu
In SKILL, you can access and change the settings in the 'Display Options' form by interacting with the Layout window's object.
Toggling dimming option:
1procedure(toggleLayoutDimming()
2    ;Toggles the dimming feature in the current layout window.
3    let((window)
4
5        window = hiGetCurrentWindow()
6
7        window~>dimmingOn = !window~>dimmingOn
8        window~>dimmingScope = "all"
9
10        printf("Enable dimming = %L\n" window~>dimmingOn)
11    )
12)
We retrieve the current window and toggle its dimmingOn value to enable the dimming option. The dimming option is a boolean value, which means you can toggle it by using the "not" operator (!). Additionally, we set the dimming scope to 'all' to ensure the dimming effect is visible.
Changing dimming intensity:
1procedure(changeLayoutDimmingIntensity(signum @key (byValue 5))
2	;Adjusts the dimming intensity of the current layout window by a
3	;specified value and direction.
4
5	;@param signum int
6	;       The direction of adjustment. Positive values increase
7	;       intensity, negative values decrease it.
8	;@key byValue int
9	;     Optional. The amount by which to adjust the dimming intensity.
10	;     Default is 5.
11
12	let((window intensity)
13
14		window = hiGetCurrentWindow()
15
16		intensity = window~>dimmingIntensity
17		intensity = (signum * byValue) + intensity
18		cond(
19			(intensity < 0
20				intensity = 0
21			)
22			(intensity > 100
23				intensity = 100
24			)
25		)
26
27		window~>dimmingIntensity = intensity
28
29		printf("Dimming intensity = %d\n" window~>dimmingIntensity)
30	)
31)
We also retrieve the current window and its dimming intensity value. This function is designed to be flexible, allowing adjustments to either increase or decrease the intensity. You can specify a different step value, with the default set to 5.
Example:
1changeLayoutDimmingIntensity(1 ?byValue 10)3. Setting Bind Keys for Functions
Now we’ve got to set bind keys for these two functions.
Each bind key can be configured with a single command, as demonstrated earlier:
1hiSetBindKey("Layout" "<Key>," "changeLayoutDimmingIntensity(-1)")
2hiSetBindKey("Layout" "<Key>." "changeLayoutDimmingIntensity(1)")
3hiSetBindKey("Layout" "<Key>/" "toggleLayoutDimming()")
Or set multiple bind keys in one command:
1hiSetBindKeys("Layout" list(
2		list("<Key>," "changeLayoutDimmingIntensity(-1)")
3		list("<Key>." "changeLayoutDimmingIntensity(1)")
4		list("<Key>/" "toggleLayoutDimming()")
5	)
6)
Here, we assign functions to the following bind keys:
- "," - Decrease dimming intensity.
- "." - Increase dimming intensity.
- "/" - Toggle dimming option on / off.
4. Bind Key Components
Each bind key requires:
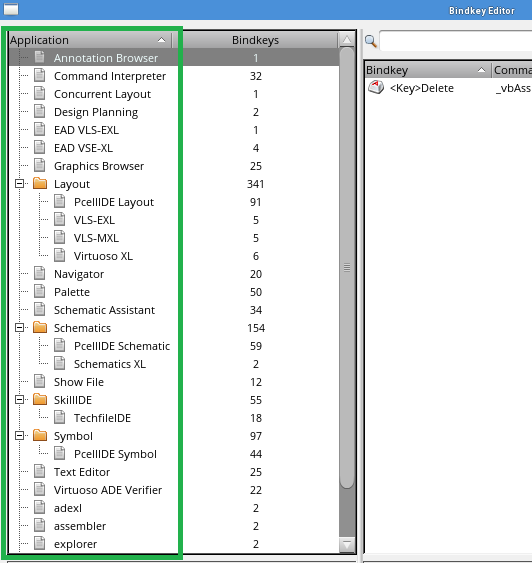
- Application Name: For the Layout window, we use "Layout". Other windows require different application names. You can find all available application names in the "Bindkey Editor" form.
- Key: The key to set the bind key to. Bind keys can also be set for the mouse. Refer to Cadence documentation for more details.
- Function Call: The function to execute.

Bindkeys Menu
5. Loading Bind Keys
Write your SKILL code with bind keys definitions in a .il file and load it from CIW using the load() function or from the SKILL IDE.
To load bind keys automatically when Virtuoso starts, define or modify the .cdsinit file with your SKILL code. Place the .cdsinit file in one of these locations:
- <your_install_dir>/tools.
/dfII/local/.cdsinit - Current directory (where Virtuoso is open) - ./.cdsinit
- Your home directory - ~/.cdsinit
Re-open Virtuoso to test the automatic loading.
- Conclusion
To maintain a clean and readable code structure, separate your bind key definitions into one file and the functions they use into another. This approach helps declutter your code and enhances readability. You can then load these files from the .cdsinit file or directly from the CIW.
Author: Eugeny Khanchin